DRONE SITE SURVEY - DO IT YOURSELF
WARNING: WE ARE NOT RESPONSIBLE IF YOU CRASH YOUR DRONE, OR FRY YOUR NANOSTATION, ETC
So here's the basic engineering:
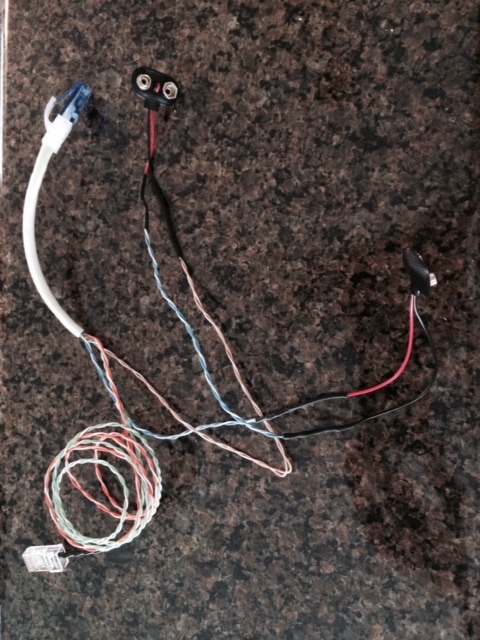
1. Make a wiring Harness
So here's the basic engineering:
1. Make a wiring Harness
Place two(2) 9volt batteries in series, are enough to power the nanostation for about 15-20 minutes (typical phantom vision flight time). When it starts to undervolt, the nanostation circuitry must have some good failsafe design, as it just starts blinking on/off.
Made a simple wiring harness with the two 9v battery clips, solder, and heat shrink (recommend using a spare patch cable rather than standard solid core cat5e cable (because typical patch cables are made with stranded cables rather than solid core).
FYI, Blue/Blue-White is Positive and Brown/Brown-White is negative. If you'd like, you can terminate the Orange/Orange-white and Greean/Green-White in the standard locations of an RJ45 (EIA-568-B) to alow you to plug your laptop into the nano station.
Really this is completely unnecessary as you should config the nanostation on a better power source as once you start using the 9volt batteries, you only have about 15-20 minutes of battery life. I will also mention that at the end of the battery life/flight (depending on the batteries you use) the radios start loosing power, and your db's will start to go up and upover about a minute or two untill it shuts off completely.
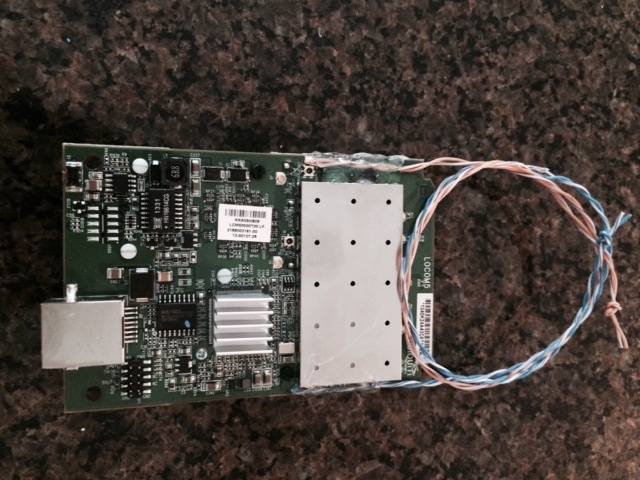
2. Remove the board out of the nanostation:
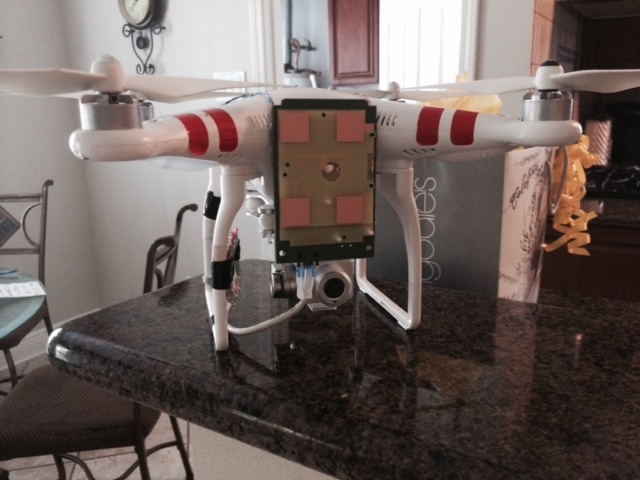
There is one screw on the back of the nanostation behind the label that allows the circuit board to simply slide out the bottom of the plastic case. Then two screws to remove the bottom plastic piece. As shown in the pic, I just hot glued two pieces of cat5 cable to the back of the board to use to attach to the drone. I am actually designing a bracket that will alow the nanostation board to attach easilly to the drone (one of my school sites has 3D printer they will let me use : ) I will publish the bracket file once I complete and test the design... maybe I'll sell em somewhere too : ) as shown in the pic, I just drap the cat5 cable over the top and tape with electrical tape to secure (make sure you have about 1/4" prop clearance).
There is one screw on the back of the nanostation behind the label that allows the circuit board to simply slide out the bottom of the plastic case. Then two screws to remove the bottom plastic piece. As shown in the pic, I just hot glued two pieces of cat5 cable to the back of the board to use to attach to the drone. I am actually designing a bracket that will alow the nanostation board to attach easilly to the drone (one of my school sites has 3D printer they will let me use : ) I will publish the bracket file once I complete and test the design... maybe I'll sell em somewhere too : ) as shown in the pic, I just drap the cat5 cable over the top and tape with electrical tape to secure (make sure you have about 1/4" prop clearance).
3. Fasten/tape the battereies, and wireing harness to the drone (self explanitory).
4. Figure out how you will access the two sides to check sig strength. There are a few ways to do this. The first time I did this, I was at my house about 5 miles away with an airgrid on the top of our 12 strory office building. I had my laptop outside connected conntected to my house wifi, and vpn'd onto our corp network and acessed the airgrid that way. The other and probably easier way to do it is put the nanostation on the drone in AP mode, and that way you can just plug another nanostation into your laptop pointed up to the drone (probably the easies way.) Or, you could just send your buddy, intern, whatever, to the other side with a laptop to record the results. This is probably the best way, as I would assume in most cases you'll want some kind of good directional device at the easilly accessible side like a rocket dish, nanobeam or airgrid (if you even use those : ) as two nanostations are not good for distance. Because of the directionality, you may want your pal at the other side to be able to adjust the dish to get your best db's.
5. Take off! I would HIGHLY recomend, if you are using the Phantom Vision, that you wait and ensure GPS lock before taking off. The reason for this is that by attaching all this stuff to the drone alters it's balance. The GPS lock on the phantom is quite invaluable. When I did my tests, I was able to bring the thing to altitude, and it will just stay there. I just make a few granular adjustments (mostly just rotate left or right).
Also, due to the weight, DO NOT wait until 15% battery life to decend. If you wait until the drone comes down automatically, the added weight is not calculated and the drone comes down VERY FAST.
Also, due to the weight, DO NOT wait until 15% battery life to decend. If you wait until the drone comes down automatically, the added weight is not calculated and the drone comes down VERY FAST.


